本文将介绍如何使用 Python 对 TiDB 进行应用开发,并做简单的 CRUD 演示。TiDB 6.0 Book Rush 的第二章 。
测试环境
为了便于演示应用开发,本文将使用 TiDB 6.0 本地测试集群,以及 MariaDB Connector/Python,具体环境版本信息如下。
TiDB 6.0
部署本地测试集群
快速启动本地测试集群,具体方法请参考 官方文档–部署本地测试集群 和文章 《TiUP:TiDBAer 必备利器》 。
1 tiup playground v6.0.0 --host 192.168 .8 .101 --tag classroom --pd 3 --kv 2 --db 1 --tiflash 1
1
2
3
4
CLUSTER START SUCCESSFULLY, Enjoy it ^-^ To connect TiDB: mysql --comments --host 192.168.8.101 --port 4000 -u root -p (no password) To view the dashboard: http://192.168.8.101:2379/dashboard PD client endpoints: [192.168.8.101:2379 192.168.8.101:2382 192.168.8.101:2384]
Python 连接器
介绍几种常见的 Python 连接器
TiDB 高度兼容 MySQL 5.7 协议,理论上只要是支持 MySQL 及其分支版本的 Python 连接器都可以连接 TiDB,但仍需要具体测试。
除这两种官方连接器之外,还有两种常见的客户端,分别是:
本文使用的是 MariaDB Connector/Python,下面将做具体演示。
安装 Python 连接器
CentOS 7 环境
由于 MariaDB Connector/Python 使用 Python 3 编写,且依赖 MariaDB Connector/C,所以需要先安装依赖包。
1 sudo yum install -y MariaDB-devel gcc python3-devel
1
2
3
4
shawnyan@centos7:~$ rpm -q MariaDB-devel gcc python3-devel MariaDB-devel-10.6.7-1.el7.centos.x86_64 gcc-4.8.5-44.el7.x86_64 python3-devel-3.6.8-18.el7.x86_64
1 python3 -m pip install mariadb --user
1
2
3
4
shawnyan@centos7:~$ python3 -m pip install mariadb --user Installing collected packages: mariadb Running setup.py install for mariadb ... done Successfully installed mariadb-1.0.11
1
2
shawnyan@centos7:~$ python3 -m pip install mariadb --user Requirement already satisfied: mariadb in /home/shawnyan/.local/lib/python3.6/site-packages (1.0.11)
1
2
3
4
5
6
7
8
9
10
11
shawnyan@centos7:~$ python3 -m pip show mariadb Name: mariadb Version: 1.0.11 Summary: Python MariaDB extension Home-page: https://www.github.com/mariadb-corporation/mariadb-connector-python Author: Georg Richter Author-email: License: LGPL 2.1 Location: /home/shawnyan/.local/lib/python3.6/site-packages Requires: Required-by:
到此,安装完成!
Windows 环境
与 CentOS 环境类似,需要安装 MariaDB Connector/C,下载页面为 Connectors 。
此外,还需要安装 Microsoft Visual C++ 14.0,下载页面为 Microsoft Visual C++ Build Tools 。
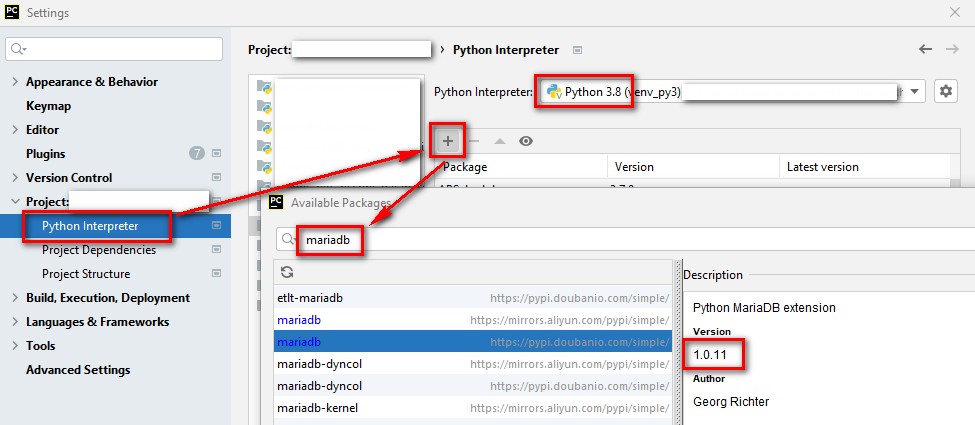
本文示例代码是在 PyCharm 中开发的,所以在安装完成依赖后,直接在 PyCharm 中安装 MariaDB Connector/Python。
安装路径为:File > Settings > Project > Available Packages。
图-安装mariadb包
到此,安装完成!
CURD 实践
基础数据
通过 tiup demo 创建基础数据,会自动在 TiDB 中创建库 bookshop
Bookshop 是一个虚拟的在线书店应用,你可以在 Bookshop 当中便捷地购买到各种类别的书,也可以对你看过的书进行点评。
1 tiup demo bookshop prepare -H 192.168.8.101
1
2
3
4
5
6
7
8
9
10
11
12
13
14
15
16
17
18
19
shawnyan@centos7:~$ tiup demo bookshop prepare -H 192.168.8.101 tiup is checking updates for component demo ... Starting component `demo`: /home/shawnyan/.tiup/components/demo/v0.0.8/tidb-dataset /home/shawnyan/.tiup/components/demo/v0.0.8/tidb-dataset bookshop prepare -H 192.168.8.101 INFO[0000] Creating the tables if not existed.... dataset=bookshop INFO[0000] Creating table books. dataset=bookshop INFO[0000] Creating table users. dataset=bookshop INFO[0000] Creating table authors. dataset=bookshop INFO[0000] Creating table book_authors. dataset=bookshop INFO[0001] Creating table orders. dataset=bookshop INFO[0001] Creating table ratings. dataset=bookshop INFO[0001] Finished creating tables! dataset=bookshop INFO[0001] Clearing the old data.... dataset=bookshop INFO[0002] Loading users data... dataset=bookshop INFO[0004] Loading books data... dataset=bookshop INFO[0006] Loading authors data... dataset=bookshop INFO[0008] Loading book authors data... dataset=bookshop INFO[0009] Loading book orders data... dataset=bookshop INFO[0039] Loading book ratings data... dataset=bookshop INFO[0071] Finished! dataset=bookshop
1
2
3
4
5
6
7
SELECT CONCAT(table_schema,'.' ,table_name) AS 'Table Name' , table_rows AS 'Number of Rows' FROM information_schema.TABLES WHERE table_schema = 'bookshop' ORDER BY 1 ;
1
2
3
4
5
6
7
8
9
10
11
+ | Table Name | Number of Rows | + | bookshop.authors | 20000 | | bookshop.book_authors | 20000 | | bookshop.books | 20000 | | bookshop.orders | 300000 | | bookshop.ratings | 300000 | | bookshop.users | 9985 | + 6 rows in set (0.018 sec)
使用 Python 连接器创建连接
需要配置连接信息,默认为不自动提交:
1
2
3
4
5
6
7
8
conn_params = { "user" : "root" , "password" : "" , "host" : "192.168.8.101" , "port" : 4000 , "database" : "bookshop" , "autocommit" : False }
检查基本连接信息
可调用连接器内置方法,直接查看数据库版本和会话的字符集。发送查询语句,查看自动提交的参数值。
1 2 3 4 5 6 7 8 print ("Server Version:" , conn.server_info)print ("Connection Charset:" , conn.character_set, conn.collation)cursor.execute("SHOW VARIABLES LIKE 'autocommit'" ) resAutoCommit = cursor.fetchone() print (resAutoCommit)
1
2
3
Server Version: 5.7.25-TiDB-v6.0.0 Connection Charset: utf8mb4 utf8mb4_general_ci ('autocommit', 'OFF')
注:utf8mb4。
单值写入
下面将分单值写入、多值写入、单值查询,以及多值查询四种情况分别做演示。
向 books 表中插入一条数据,并在之后手动提交:
1 2 3 4 sqlInsertOne = "REPLACE INTO books (id, title, published_at) VALUES (1, 'tidb-monthly', '2022-05-09')" cursor.execute(sqlInsertOne) conn.commit()
如果 TiDB Server 已开启 General 日志,则可以在日志文件中看到:
1
2
[2022/05/12 22:26:05.103 +08:00] [INFO] [session.go:3264] [GENERAL_LOG] [conn=467] [user=root@%] [schemaVersion=144] [txnStartTS=0] [forUpdateTS=0] [isReadConsistency=false] [current_db=bookshop] [txn_mode=PESSIMISTIC] [sql="REPLACE INTO books (id, title, published_at) VALUES (1, 'tidb-monthly', '2022-05-09')"] [2022/05/12 22:26:05.120 +08:00] [INFO] [session.go:3264] [GENERAL_LOG] [conn=467] [user=root@%] [schemaVersion=144] [txnStartTS=433157718689710084] [forUpdateTS=433157718689710084] [isReadConsistency=false] [current_db=bookshop] [txn_mode=PESSIMISTIC] [sql=COMMIT]
多值写入
也可将多组值包装到一个字典中,然后传递给执行器,此时就用到了 executemany,可一次性执行多条语句,并将其封装在一个事务内,以保证写入数据的完整性。
1 2 3 4 5 6 7 8 9 data = [ (10 , 'TiDB Book Rush' , '2022-05-10' ), (11 , 'TiDB Blog' , '2022-05-11' ), (12 , 'TiDB 6.0 Release' , '2022-05-12' ) ] sqlInsertMulti = "REPLACE INTO books (id, title, published_at) VALUES (?, ?, ?)" cursor.executemany(sqlInsertMulti, data)
TiDB Server 的 General 日志打印如下:
1
2
3
4
5
[2022/05/12 22:26:05.131 +08:00] [INFO] [session.go:3264] [GENERAL_LOG] [conn=467] [user=root@%] [schemaVersion=144] [txnStartTS=0] [forUpdateTS=0] [isReadConsistency=false] [current_db=bookshop] [txn_mode=PESSIMISTIC] [sql=BEGIN] [2022/05/12 22:26:05.154 +08:00] [INFO] [session.go:3264] [GENERAL_LOG] [conn=467] [user=root@%] [schemaVersion=144] [txnStartTS=433157718702817281] [forUpdateTS=433157718702817281] [isReadConsistency=false] [current_db=bookshop] [txn_mode=PESSIMISTIC] [sql="REPLACE INTO books (id, title, published_at) VALUES (?, ?, ?) [arguments: (10, \"TiDB Book Rush\", \"2022-05-10\")]"] [2022/05/12 22:26:05.162 +08:00] [INFO] [session.go:3264] [GENERAL_LOG] [conn=467] [user=root@%] [schemaVersion=144] [txnStartTS=433157718702817281] [forUpdateTS=433157718702817281] [isReadConsistency=false] [current_db=bookshop] [txn_mode=PESSIMISTIC] [sql="REPLACE INTO books (id, title, published_at) VALUES (?, ?, ?) [arguments: (11, \"TiDB Blog\", \"2022-05-11\")]"] [2022/05/12 22:26:05.168 +08:00] [INFO] [session.go:3264] [GENERAL_LOG] [conn=467] [user=root@%] [schemaVersion=144] [txnStartTS=433157718702817281] [forUpdateTS=433157718702817281] [isReadConsistency=false] [current_db=bookshop] [txn_mode=PESSIMISTIC] [sql="REPLACE INTO books (id, title, published_at) VALUES (?, ?, ?) [arguments: (12, \"TiDB 6.0 Release\", \"2022-05-12\")]"] [2022/05/12 22:26:05.178 +08:00] [INFO] [session.go:3264] [GENERAL_LOG] [conn=467] [user=root@%] [schemaVersion=144] [txnStartTS=433157718702817281] [forUpdateTS=433157718702817281] [isReadConsistency=false] [current_db=bookshop] [txn_mode=PESSIMISTIC] [sql=COMMIT]
单值读取
因为 TiDB 使用 utf8_bin 做为默认校验规则,所以查询条件会区分大小写,这里使用内置函数 lower() 将所有字符转成小写,来消除大小写区分的影响。
使用 fetchone() 方法查询一条结果,并用 | 作为分隔符将结果打印。
1 2 3 4 cursor.execute("SELECT * FROM books where lower(title) like 'tidb%'" ) row = cursor.fetchone() print ("Select One Row:" , *row, sep='|' )
1 Select One Row:|1|tidb-monthly|Magazine|2022-05-09 00:00:00|0|0.00
多值读取
对于多值读取的情况,可使用 fetchmany(size: int) 方法,传入欲获取的行数后执行,即可得到需要的结果集。
1 2 3 4 5 6 7 8 9 cursor.execute("SELECT * FROM books where lower(title) like 'tidb%'" ) row = cursor.fetchmany(10 ) print ("rows_affected:" , cursor.rowcount)res = [] for i in row: res.append({"id" : i[0 ], "book" : i[1 ], "published" : "{:%Y-%m-%d}" .format (i[3 ])}) print ("Select Many Rows:" , res)
1
2
rows_affected: 4 Select Many Rows: [{'id': 1, 'book': 'tidb-monthly', 'published': '2022-05-09'}, {'id': 10, 'book': 'TiDB Book Rush', 'published': '2022-05-10'}, {'id': 11, 'book': 'TiDB Blog', 'published': '2022-05-11'}, {'id': 12, 'book': 'TiDB 6.0 Release', 'published': '2022-05-12'}]
小结
到此,以上四种情况已全部演示完毕。
示例:查询 Books 表所在的 TiKV 节点的版本和地址,并输出结果。
1 2 3 4 5 6 7 8 9 10 11 12 13 14 15 16 17 18 19 20 21 22 23 24 25 26 27 28 29 30 31 32 33 34 35 36 37 38 39 40 import mariadbconn_params = { "user" : "root" , "password" : "" , "host" : "192.168.8.101" , "port" : 4000 , "database" : "bookshop" , "autocommit" : False } conn = mariadb.connect(**conn_params) cursor = conn.cursor(buffered=True ) print ("Server Version:" , conn.server_info)print ("Connection Charset:" , conn.character_set, conn.collation)cursor.execute( "SELECT DISTINCT t1.DB_NAME,t1.TABLE_NAME, t1.REGION_ID, t3.ADDRESS, t3.version " "FROM information_schema.tikv_region_status t1 INNER JOIN information_schema.tikv_region_peers t2 " "ON t1.REGION_ID = t2.region_id INNER JOIN information_schema.TIKV_STORE_STATUS t3 ON t2.STORE_ID = t3.STORE_ID " "WHERE t1.DB_NAME = 'bookshop' AND t1.TABLE_NAME = 'books'" ) row = cursor.fetchall() res = [] for i in row: res.append({"DB" : i[0 ], "TABLE" : i[1 ], "REGION_ID" : i[2 ], "TIKV_ADDR" : i[3 ], "TIKV_VERSION" : i[4 ]}) print ("Select Many Rows:" , res)cursor.close() conn.close()
输出结果为:
1
2
3
Server Version: 5.7.25-TiDB-v6.0.0 Connection Charset: utf8mb4 utf8mb4_general_ci Select Many Rows: [{'DB': 'bookshop', 'TABLE': 'books', 'REGION_ID': 4028065, 'TIKV_ADDR': '192.168.8.101:20161', 'TIKV_VERSION': '6.0.0'}]
以上就是本文的全部内容,其他开发语言的开发实践,请参考官方文档,或扩展阅读。
扩展阅读
https://www.modb.pro/db/403262 https://tidb.net/blog/ef4c1f65?shareId=2923d1b6 https://tidb.net/book/book-rush/developer-guide/simple-crud/sample-application-python


